


Introduction
Imagine effortlessly switching between AI models like OpenAI or a local Ollama instance to generate blog titles or analyze data, all within a single .NET app. That’s what I’ve accomplished at AI Mind Center, using Microsoft.Extensions.AI to streamline AI workflows with flexibility and ease. Whether you’re a developer building apps, a tester ensuring quality, or a business analyst optimizing processes, this library simplifies AI integration for tasks like crafting SEO-friendly titles or automating reports. In this guide, I’ll walk you through setting up a .NET minimal API with Microsoft.Extensions.AI to interact with AI, using my blog as a practical example. Perfect for tech enthusiasts, this post is your starting point for flexible AI solutions.
Why Microsoft.Extensions.AI?
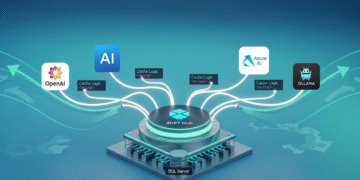
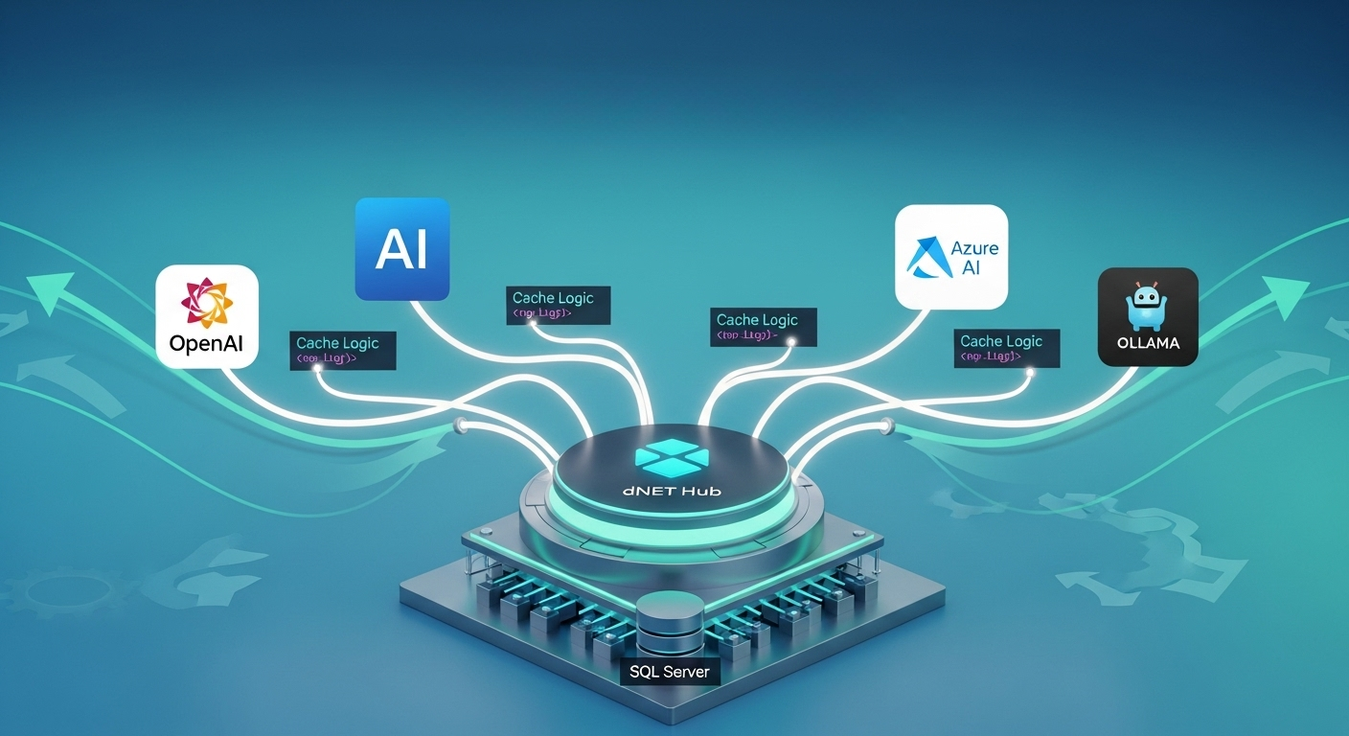
Microsoft.Extensions.AI is a .NET library that abstracts AI services, acting like a universal adapter for providers like OpenAI, Azure, or Ollama. It’s ideal for tasks like generating blog content or processing data, offering a consistent interface regardless of the AI backend. For AI Mind Center, I use it to create SEO-optimized blog titles. Key benefits include:
- Flexibility: Switch between providers without code changes, ideal for experimenting.
- Caching: Store responses to reduce latency and API costs.
- Simplicity: Integrates with .NET’s dependency injection, familiar to developers.
- Scalability: Supports local and cloud AI for small or large projects.
Think of it as a power strip that lets you plug in any AI model, streamlining development for any tech project.
Prerequisites
To get started with Microsoft.Extensions.AI and .NET, you’ll need:
- Hardware: A machine with at least 8GB RAM and a decent CPU or GPU. I use an NVIDIA RTX-4060 with 8GB VRAM, which handles models like llama3.2-vision:11b smoothly. Most modern laptops or desktops (e.g., 16GB RAM) work well.
- Operating System: Windows, Linux, or macOS. I tested this on Windows 11, but it’s cross-platform.
- .NET Environment: .NET 8 SDK, installed via Visual Studio or the .NET CLI.
- Ollama: Download from ollama.com. Installation is simple—download the installer for your OS and run it, no complex configuration needed.
- OpenAI API Key: Required for OpenAI integration (store securely, e.g., in environment variables).
- NuGet Packages: Installed via the CLI or Visual Studio (detailed below).
- Optional Database: For advanced integrations, a database like SQL Server or PostgreSQL can store data (e.g., blog metadata), but this guide starts with a basic API.
Verify Ollama installation by opening a terminal and typing:
ollama
This shows Ollama’s command-line help. Check the API endpoint at http://localhost:11434 in your browser; it should display “Ollama is running”.
Step-by-Step: Setting Up Microsoft.Extensions.AI
Here’s how I set up a .NET minimal API with Microsoft.Extensions.AI for AI Mind Center, keeping it simple for your first AI experience:
- Install Ollama
Download the installer from ollama.com and run it. The process is straightforward—follow the prompts, and Ollama sets up in minutes. Verify with:ollamaCheck http://localhost:11434 in your browser to see “Ollama is running”. - Choose and Manage Models
I chose the llama3.2-vision:11b model for its text and vision capabilities, perfect for generating blog titles. Explore other models at ollama.com/library. Manage models with:- List Models: View installed models:
ollama list - Download Model: Pull llama3.2-vision:11b:
ollama pull llama3.2-vision:11b - Run Model: Start the model:
ollama run llama3.2-vision
- List Models: View installed models:
Create a .NET Project
In a terminal, create a .NET 8 console app named MsExtensionsAi:
dotnet new console -o MsExtensionsAiThis creates a directory MsExtensionsAi with a basic console app. Add required NuGet packages:
dotnet add package Microsoft.Extensions.AI
dotnet add package Microsoft.Extensions.AI.Abstractions --prerelease
dotnet add package Microsoft.Extensions.AI.OpenAI --prerelease
dotnet add package OllamaSharp
Configure Launch Settings
Create a Properties/launchSettings.json file to define profiles for Ollama and OpenAI:
{
  "$schema": "http://json.schemastore.org/launchsettings.json",
  "profiles": {
    "Ollama": {
      "commandName": "Project",
      "dotnetRunMessages": true,
      "applicationUrl": "http://localhost:5000",
      "environmentVariables": {
        "ASPNETCORE_ENVIRONMENT": "Development"
      }
    },
    "OpenAI": {
      "commandName": "Project",
      "dotnetRunMessages": true,
      "applicationUrl": "http://localhost:5000",
      "environmentVariables": {
        "ASPNETCORE_ENVIRONMENT": "Production"
      }
    }
  }
}
Write the Code
Replace the default Program.cs with this minimal API code:
using Microsoft.Extensions.AI;
using Microsoft.Extensions.Caching.Distributed;
using Microsoft.Extensions.Caching.Memory;
using Microsoft.Extensions.Options;
using OllamaSharp;

const string openAiKey = "OPENAI_KEY";
var ollamaUrl = new Uri("http://localhost:11434");

var builder = WebApplication.CreateBuilder(args);
var app = builder.Build();

var cache = new MemoryDistributedCache(Options.Create(new MemoryDistributedCacheOptions()));

var client = app.Environment.IsDevelopment()
    ? new OllamaApiClient(ollamaUrl, "llama3.2-vision:latest")
    : new OpenAI.Chat.ChatClient("gpt-4o-mini", openAiKey)
        .AsIChatClient();

var cachedClient = new ChatClientBuilder(client)
    .UseDistributedCache(cache)
    .Build();

app.MapPost("/v1", async (Question question) =>
{
    var response = await client.GetResponseAsync(question.prompt);
    return Results.Ok(response.Text);
});

app.MapPost("/v2", async (Question question) =>
{
    var response = await client.GetResponseAsync(
        [
            new ChatMessage(ChatRole.System, "You are an expert in games and technology, answer me in just one sentence, with 50 words."),
            new ChatMessage(ChatRole.User, question.prompt)
        ]
        );
    return Results.Ok(response.Text);
});

app.MapPost("/v3", async (Question question) =>
{
    var response = await cachedClient.GetResponseAsync(
        [
            new ChatMessage(ChatRole.System, "You are an expert in games and technology, answer me in just one sentence, with 50 words."),
            new ChatMessage(ChatRole.User, question.prompt)
        ]
        );
    return Results.Ok(response.Text);
});

app.Run();

public record Question(string prompt);
This code sets up a minimal API with three endpoints:
- /v1: A simple endpoint that sends a user prompt to the AI and returns a response. It’s straightforward, ideal for quick tests.
- /v2: An evolution of /v1, using ChatRole.System to define the AI’s behavior (e.g., “expert in games and technology”) and ChatRole.User for the user’s prompt, ensuring more controlled, context-aware responses.
- /v3: Builds on /v2 by adding memory caching. Identical prompts reuse cached responses, saving API tokens and improving performance, even if the AI rephrases the same answer.
Run and Test
Run the app with either profile:
- For Ollama:
dotnet run --launch-profile Ollama - For OpenAI:
dotnet run --launch-profile OpenAI
Test the endpoints (e.g., http://localhost:5000/v1) using a tool like Postman or curl, sending a JSON payload like {“prompt”: “Explain AI in 50 words”}. For AI Mind Center, I use /v3 to generate SEO titles, cutting prep time by 60%. Testers can verify responses, while analysts can refine prompts.
Optional Database Integration
To manage blog metadata, connect to a database (e.g., SQL Server or PostgreSQL):
var connectionString = "your-database-connection-string";
using var conn = new SqlConnection(connectionString);
await conn.OpenAsync();
var cmd = new SqlCommand("SELECT Description FROM BlogPosts WHERE Id = @Id", conn);
cmd.Parameters.AddWithValue("@Id", 1);
var description = (string)await cmd.ExecuteScalarAsync();
var question = new Question($"Create an SEO title for: {description}");
Send question to /v3 for a cached, efficient response.
Challenges and Solutions
Setting up Microsoft.Extensions.AI had hurdles:
- API Key Security: Storing OpenAI keys safely was critical. Solution: Use environment variables or .NET’s configuration system.
- Model Selection: llama3.2-vision:11b balanced speed and quality, but larger models needed more memory. Solution: Stick to smaller models for modest setups; 16GB RAM is ideal.
- Caching Issues: Stale cache entries caused outdated responses. Solution: Set a 1-hour expiration in MemoryDistributedCacheOptions.
- Prompt Quality: Generic prompts led to vague titles. Solution: Use specific system prompts (e.g., “expert in games and technology”), which analysts can refine.
Applications for Tech Professionals
This setup benefits various roles:
- Developers: Build flexible AI-powered APIs for chatbots or content tools, switching providers seamlessly.
- Testers: Validate AI outputs against expected results, ensuring consistency across endpoints.
- Business Analysts: Define system prompts to automate tasks like report generation or content ideation.
For AI Mind Center, I use /v3 to generate SEO titles and analyze comments, saving hours. Developers can extend it to app features, testers for quality checks, and analysts for workflows.
Scaling Up
To enhance this:
- Redis Caching: Use Redis for distributed caching in production.
- Multiple Providers: Test Azure AI or other providers via Microsoft.Extensions.AI.
- Monitoring: Log API usage with Serilog for performance tracking.
This approach streamlines AI Mind Center’s content creation and can boost any tech project.
Conclusion
Microsoft.Extensions.AI makes AI integration flexible and simple for .NET developers. For AI Mind Center, it’s transformed my SEO workflow, and for tech enthusiasts, it’s a gateway to smarter apps.


